2010年7月30日星期五

Join the Club: Facebook Has a Question, Too

As we noted earlier this week, the tech/media world is obsessed with questions: Start-ups that can describe themselves as question services get showered with money and big valuations; big players like Yahoo (YHOO) have had them for a while, and not-so big players like Ask are promoting their forays into questionland, too.

Now comes Facebook. The social network has had its own question service in a private beta for some time, but it’s finally come clean about it, via a blog post from product management boss Blake Ross.

The service is still in beta, which means that not all of you will be able to see it immediately. But I can, and I can report that… it’s a question service. As previously reported, it’s somewhat like Quora, the superhot question service founded by Facebook vets.

For my money though, it’s considerably easier for newbies to jump into than Quora, primarily because you’re likely to immediately see queries from your friends–or at least, the Facebook equivalent of friends.

The version I’ve been playing with this afternoon is also buggy–it is having a hard time guiding me to question categories–but I assume that will get fixed quickly.

My question, which I posed using Facebook’s new tool: To what end?

Search engine optimization pros will tell you that question services do great on search results, so I suppose that’s good for Facebook. And if Facebook’s service takes off, it gives users one less reason to head to a rival to lob in their queries.

But many Facebook users I know are already asking their friends for advice using the service, and I’m not sure that formalizing the process–and making the process “public and visible to everyone on the Internet”–will prompt them to do more of it. We’ll see.

2010年7月28日星期三

There Will Be Blood: Why Apple and Intel Are Destined to Clash

A long time ago, in what seems like a galaxy far, far away, Apple and Google were the Brad and Jennifer of the tech world. Google had the cloud, Apple had the clients, and both companies were such industry darlings that fantasizing about world-changing Apple/Google team-ups was a popular pundit pastime.

Read the rest of this post on the original site

2010年7月25日星期日

How to share the iTunes Music and videos between two computers for free

Some people may meet that situation: You and your brother both have iTunes library under the same credit card account. Occasionally, you want to get the same song, however you wouldn't want you both to pay the $0.99 where virtually the same account is purchasing the song twice. So how can you and/or he download the songs from each other once it's purchased on a single computer? This is a guide to tell you how to share iTunes Music and videos between two computers such as sharing iTunes Music and videos between Windows PC and Mac OS X, sharing iTunes Music and videos between Mac OS and Mac OS X and sharing iTunes Music and videos between Windows PC and Windows PC

Step 1, Networking computers.
If you want to share iTunes videos and music between computers, you need to network PC and Mac first.
If you do not know how to Network Windows with Mac OS X, go there:
Networking Windows (2000/XP/2003*) with Mac OS X (10.3/10.4)
Information you will need to know
1.The IP Address of your PC (Start > Run > CMD {return} > "ipconfig" {return})
2The IP Address of your Mac (Applications > Utilities > Terminal {Run app} > for ethernet connection "ipconfig getifaddr en0" {return} or for wireless "ipconfig getifaddr en1" {return})>
3.The workgroup the PC is in (Right click on My Computer, select Properties, and select the Computer Name tab)

System Configuration
It is important that the account you log in with on your XP system has a password set, if it does not you will not be able to login to your Windows share from OS X. You need to put your Mac in the same workgroup as your Windows PC. To do this open "Directory Access" (Applications > Utilities > Directory Access). Click on the padlock in the bottom left corner to make changes; you will be prompted for your password. If "SMB" is not ticked off, then tick it off. Select "SMB" and hit the "Configure…" button. Now enter the name of your Windows workgroup. In my case the name is "AD".

Share iTunes videos between pc and Mac, iTunes videos from pc to  Mac

Setting up the PC to share files
You need to create and share a folder on your PC that you will then access from your Mac. To do this create a folder (or select and existing one) right click on it from Windows Explorer and select "Properties". Select the "Sharing" tab and share out the folder. I'd recommend you use a one word name for the share. For example "Mac", not "Apple Mac Share", it just narrows the risk of complications.

Share iTunes videos between pc and Mac, iPod videos from pc to Mac

Setting up the Mac to share files
Open "System Preferences" (Applications > System Preferences). Go to "Sharing" under "Internet & Network", and tick off "Windows Sharing", and if it doesn't start by itself, click "Start". This will share out your entire home folder.

iTunes videos from pc to Mac

If You're running Tiger (10.4), you will also need to click the "Accounts" button and tick off the box next to your account name so that OS X knows to share out your particular home folder.

iTunes videos from pc to Mac

Step2, Go to preferences, under the sharing tab, enable "Share library..." and "Look for shared libraries..." on both computers.
Select the items you want to share.share iTunes videos and music for free

It will show up in iTunes' side panel:
share iTunes videos and music for free

To require users to enter a password before they can see your shared items, select "Require password" and enter a password.
You will need to authorize both computers to play purchased content however. You may authorize up to 5 Machines per iTunes Music Store account.
Tips:If you want to share music with other users on your computer ,read this article: iTunes: How to share music between different accounts on a single computer

How to convert MTS, TS, M2TS Video to HD video, MP4, WMV, AVI

Record everything around you and share with the world/friends/family is becoming more and more popular among young people. Get a HD Camcorder is necessary and also how to share is really important. I think you can use youtube.com, make a DVD and so on. As the video you record on your camcorder is MTS, TS, M2TS or other HD video format, so you have to convert them into normal video format to edit.

Today I will share with you how to convert MTS, TS, M2TS video to normal video formats.
You need 3 nice tool to do it: MTS Converter, TS Video Converter, M2TS Converter.

Part 1: How to convert MTS video
Step 1: Load Video
Click "Add File" to load the video that you want.

MTS converter

Step 2: Choose Your Output Profile and Settings
From "Profile" drop-down list you can choose your output profile according to your need.
For example, if you have a iPod and you want to convert video for it, you need to choose "iPod" from the profile list and then it also provides the second chance to specify your iPod generation.
You can also click "setting" adjust the settings of your output video, such as "video/audio encoder", "Video/audio Bitrate", "Channels", "Resolution" and so on..

Step 3: Video Editing
This powerful MTS Converter allows you to do many video editings.
1. Click "Effect" to make special effect for your movie.
You can adjust the "Brightness", "Contrast", "Saturation" and also you can use "deinterlacing" to improve you output effect.

effect

2. Trim:
"Trim" function allows you to pick up any part of your video to convert. You can just convert a part of your video that you want.

trim

3: Crop:
Cut off the black edges of the original movie video and watch in full screen on your iPod using the "Crop" function.

crop

Step 4: Conversion
After you have done all the steps above you can click "Start" button to start your conversion.

Part 2: How to convert TS video

TS video converter

Step 1: Load Video
Click "Add File" to load the video that you want to convert.

Step 2: Choose Your Output Profile and Settings
From "Profile" drop-down list you can choose your output profile according to your need.
You can also click "setteing" adjust the settings of your output video, such as "video/audio encoder", "Video/audio Bitrate", "Channels", "Resolution" and so on..

Step 3: Conversion
After you have done all the steps above you can click "Start" button to start your conversion.

Tips: Video Editing
This powerful TS Converter allows you to do many video editings.
1. Click "Effect" to make special effect for your movie.
You can adjust the "Brightness", "Contrast", "Saturation" and also you can use "deinterlacing" to improve you output effect.
2. Trim:
"Trim" function allows you to pick up any part of your video to convert. You can just convert a part of your video that you want.
3: Crop:
Cut off the black edges of the original movie video and watch in full screen on your iPod using the "Crop" function.

Part 3: How to convert M2TS video

M2TS converter

Step 1: Add File
Load your M2TS video.

Step 2: Choose Profile and Settings
Select your output profile according your need and adjust the settings of your output video if you like.
(the default setting works well)

Step 3: Start Conversion
Click "Start" to begin your conversion.

2010年7月22日星期四

How to sync and put cusomized ringtone on iPhone

There are also some other ways to convert audio to iPhone ringtone and sync it to iPhone with iTunes, but I think these are a little complicated and users may be at a loss with such ways.

Here I recommend iPhone PC Suite, an almighty iPhone manager that can let you manage phone book, software, media and other files between iPhone and computer without iTunes easily.

But before using this tool, make sure your iTunes installed and has been connected with iPhone once before (Then you will never need not run iTunes when you use iPhone PC Suite to manage your iPhone).And when the first time you connecting iPhone, it will install PhoneDaemon on your iPhone, don’t worry it is green software and will do nothing harm.

Now I will show you how to sync the converted iPhone ringtone to iPhone without iTunes. Connect you iPhone to computer, double click” iPhone PC Suite” to start iPhone PC Suite, the program will scan you iPhone automatically for a short while. Then click button “Personal” on the main menu, select ”ringtone”.

put ringtong on iPhone

Click “New Ringtone” to locate the converted iPhone ringtone.put ringtong on iPhone

Select your target iPhone ringtone, then it will upload the ringtone to iPhone automatically.

put ringtong on iPhone - ringtong loading

Then you can select your favorite audio file and set it as your iPhone ringtone on iPhone. Click “setting”->”Sound”->”Ringtone”, the converted ringtone is listed on column “Customize”. Now you can enjoy the fun of your unique iPhone ringtone!
This free iPhone PC Suite also has other powerful functions, we will share them later.

Previous part: How to convert DVD, Movie, Music to iPhone ringtone and put ringtone on iPhone?

2010年7月21日星期三

Founders Fund Finds $250 Million More to Invest

Founders Fund, which has put venture capital behind companies like Facebook, Spotify and SpaceX, announced today it had closed its third venture fund–at $250 million, its largest. The money will go into consumer Internet companies, as well as those working on major science and engineering advances.

2010年7月20日星期二

Internet Has ‘Not Become The Great Leveller

“The internet has not become the great leveller that it was once thought it could be,” according to Harvard academic Ethan Zuckerman.

Mr Zuckerman was speaking at the TED Global (Technology Entertainment and Design) conference in Oxford.

Read the rest of this post on the original site

2010年7月19日星期一

NBC U’s Okay Quarter Just Fine for GE

GE doesn’t really care much about NBC Universal, which is why it’s happy to hand it off to Comcast (CMCSA) once regulators sign off. But for the record, the cable/broadcast/movie conglomerate posted an okay quarter: Revenues were up five percent and operating profit was up 13 percent, the company said this morning.

Bear in mind that a year ago, those numbers were down eight percent and 41 percent, respectively. So Jeff Zucker and company are still digging out of a hole. But whatever: Sometime, in the next 12 months or so, this will be come Brian Roberts’ and Steve Burke’s problem.

For the record, here’s how GE (GE) describes the unit’s performance to investors (click image to enlarge). As usual, NBC U’s real star is its cable business, though GE said the NBC broadcast unit had a strong upfront sales cycle, up 18 percent:

2010年7月18日星期日

How to extract MP3 Audio from DVD and Video files

Part 1. What's MP3?
MP3 stands for MPEG-1 Audio Layer III. It is not a separate format, but a part of MPEG-1 video encoding format, developed by MPEG group in early 1990's. MPEG-1 Audio Layer III (MP3) is a method to store good quality audio into small files by using psychoacoustics in order to get rid of the data from the audio that most of the humans can't hear.
Now MP3 is the most popular format for downloading and storing music. MP3 is supported by all computer systems, all partable players (iPod, iPhone, Apple TV, Zune, PSP, PS3, Creative Zen, iRiver, Video Mobile Phone, PMP, Archos, etc.), all DVD players and some car stereos.
Part 2. How to extract audio from DVD to MP3?
Sometimes you may want to extract a certain beautiful section of music or dialog from your DVD video file and save them as MP3 files. So, How can you get the perfect output mp3 music as the originals from DVD movies for burning CD or playing on your Computer and portable players? Please follow this guide:
Software you need: Aiseesoft DVD Audio Ripper
Aiseesoft DVD Audio Ripper (Mac Version / Windows Version) is an ideal solution of ripping music DVD movies and converting DVD to MP3, M4A, WMV, AAC, AC3, WMA, WAV audio file with excellent quality. It lets you choose the audio of any chapters or titles to convert, select DVD audio track, trim the audio of your DVD title or chapter, and even merge the audio from selected titles or chapters into one file.
Note: The following is the DVD Audio Ripper for Mac step by step guide, by the way, the DVD Audio Ripper for Windows has the same function with the DVD Audio Ripper for Mac, so you can take the same steps to convert DVD to MP3.

Step-by-Step guide: How to convert DVD to MP3:
Step 1: download and install Aiseesoft DVD Audio Ripper for Mac, then run this program.

Convert DVD to MP3

Step 2: load your DVD, choose any titles or chapters that you want to convert.
Step 3: Choose the output format (mp3). Set the output setting.
Step 4: Start the conversion after finishing the output settings. Now you have successfully converted you DVD movie to MP3 music, you can put them on you iPod, iPhone, or some other mp3 players and enjoy them on your pocket.

Part 3. How to extract audio from video to MP3?
How can you extract audio from video such as AVI, WMV, MP4 to MP3?
Software you need:Aiseesoft Audio Converter
Aiseesoft Audio Converter (Mac Version / Windows Version) can extract the audio track from your video files to popular audio formats such as MP3, WAV, AAC, AC3, M4A, etc with high sound quality. This Audio Converter provides you with very useful features such as trim audio, and merging added files into one file.
Note: Aiseesoft Audio Converter and Audio Converter for Mac has the same functions and similar interface, just for different OS (Windows PC and Mac OS X). We'll take Audio Converter for Mac as an example in this guide, the steps are the same as Audio Converter for Windows.

Step-by-Step guide: How to extract audio from video to MP3
Step 1: download and install Aiseesoft Audio Converter for Mac, run this program.

Convert Video to MP3

Step 2: Add Video files you want to convert to the program.
Step 3: Choose the output format (mp3).
Step 4: Click the “Start”button to start conversion.
This program completes conversions in seconds, and you can convert and play batches of files at a time.

Part 4. How to convert among all popular audio formats?
Sometimes it is necessary to convert one audio format to another because of some hardware/software restriction that the user comes up against or for some other reasons. Luckily, Aiseesoft Audio Converter has this function to suit for your requirements.
WAV to MP3: convert .wav music files to .mp3 format to reduce the size of the files by roughly a factor of 10.
WMA to MP3: A prime example of this is the Apple iPod which can’t play WMA files.
Software you need: Aiseesoft Audio Converter

Step-by-Step guide: How to convert wav, wma to MP3:
Step 1: Download and install Aiseesoft Audio Converter then run this program.
Step 2: Import the audio files you want to convert.
Step 3:Choose the output format (mp3).
Step 4: Start the conversion.

2010年7月16日星期五

Top 5 Best iPod Video Converter Review

There is hundreds of iPod software available now. After the wide investment, for you to manage your iPod efficiently, we made this iPod Video Converter Review for the best iPod Video Converters. It includes iPod Nano Converter, 3gp converter iPod, etc. So it is also the video converter review.

1. 4Videosoft iPod Video Converter
Free Download  $29.95
This iPod video converter can assist you convert MP4, MPG, MPEG, MOV, M4V, RM, WMV, ASF, MKV, 3GP, MOD, TOD, etc, even the YouTube FLV video to your iPod video or audio supporting formats.
More features:
* So cool and friendly user-interface for you to easily and quickly operate.
* Support all video and audio sources.
* More helpful editing functions for you to create your own video.
* Excellent and timely support email services.
* Free upload for life included.
* Customize output settings.

Any of the five iPod software is good. They all have the excellent features to meet your needs.

2. Aiseesoft iPod Movie Converter
Free Download  $29.00
This iPod software is designed for Windows iPod users. Convert all video and audio formats to iPod MP4, H.264, MP3, AAC, M4A.
More features:
* Easy, simple and quick installation and operation.
* Accept MPG, MPEG, MPEG2, VOB, MP4, M4V, RM, RMVB, WMV, ASF, MKV, TS, MPV, AVI, 3GP, 3G2, FLV, MPV, MOD, TOD.
* High-quality of converted video and audio.
* More editing functions: Trim, Crop, Merge into one file, Take snapshot.
* Free and life-long upgrade.
* 7*24 online email support.

3. Tipard iPod Video Converter
Free Download  $19.00
This is another best iPod Video Converter for Windows user to convert any video and audio sources to iPod MP4, H.264, MP3, AAC, M4A.
More features:
* Fully support Windows NT4/2000/2003/XP and Windows Vista, Windows 7 Hardware.
* Support batch conversion.
* Allow preview during the whole process.
* You decide the video size via adjusting the specific parameters of output file.
* Convert 3GP, FLV to iPod easily.
* The output quality is excellent.
* Life-long upgrade.

Best iPod Video Converter

4. Aiseesoft iPod Video Converter for Mac
Free Download (Intel, Power PC)  $29.00
This iPod software is the best iPod video converter for iPod Mac users to convert any video and audio formats to iPod MP4, H.264, MP3, AAC, M4A.
More features:
* Possessed with friendly user-interface.
* One of the quickest software available.
* Preview available during the whole process.
* Capture any time-length clips from source video.
* Adjust the aspect ratio.
* Pre-set the specific parameters for output format.
* Capture your favorite pictures.
* Supported formats: MPG, MPEG, MPEG2, VOB, MP4, M4V, RM, RMVB, WMV, ASF, MKV, TS, MPV, AVI, 3GP, 3G2, FLV, MPV, MOD, TOD, AAC, AC3, WAV, MID, WMA, M4A, RA, RAM.

5. Tipard iPod Video Converter for Mac
Free Download (Intel, Power PC)  $29.00
This best iPod video converter is another iPod software for iPod Mac users. Convert MPG, MPEG, MPEG2, VOB, MP4, M4V, RM, RMVB, WMV, ASF, MKV, TS, MPV, AVI, 3GP, 3G2, FLV, MPV, MOD, TOD, Youtube to iPod MP4, H.264 video formats and MP3, AAC, M4A audio formats.
System Requirement:
Processor: PowerPC® G4/G5 or Intel® processor
OS Supported: Mac OS X v10.4 - 10.5
Hardware Requirements: 512MB RAM, Super VGA (800×600) resolution, 16-bit graphics card or higher
More features:
* Works with all video sources.
* Has pre-defined settings for you to get the high or standard output quality.
* Create your own customized video under the useful editing functions of trim, crop, join.
* Total preview for the whole process.
* 7*24 email support.

Best iPod Video Converter for Mac

Hope the best iPod Video Converter, iPod Video Converter for Mac software would help you, and make your digital media life colorful.

2010年7月11日星期日

How to put DVD movie into Windows Movie Maker and iMovie

If you want to edit a DVD movie with Windows Movie Maker or import several DVD clips into Mac iMovie to build a new DVD, but you get frustrated with the DVD format, this guide may help you solve the problem.

Before you get started, it will be helpful if you learn something about the DVD, WMM and iMovie.
General DVDs have CSS copy protection in MPEG-2 or VOB format.
(Windows) Windows Movie Maker supports WMV, AVI and MPG video files.
(Mac) iMovie accepts MOV and MPEG4 video files.

This guide includes two parts:
1. How to put DVD movie into Windows Movie Maker.
2. How to add DVD clips to Apple Mac iMovie .

Part1. How to put DVD movie into Windows Movie Maker

Step1. To put a DVD movie into Windows Movie Maker, you have to rip your DVD to WMV or AVI video first, and then you can load it into Windows Movie Maker. I’d prefer using Aiseesoft DVD Ripper to do this. You can get this program at: http://www.aiseesoft.com/dvd-ripper.html Then install and run it, put your DVD disc into your DVD drive, click “Load DVD” to locate your DVD file and import it, or load it by clicking “Load IFO File” to add DVD IFO file. (This DVD Ripper can rip copyright protected DVD movies, but you should remember that it’s illegal rip DVD for any business purposes)

Rip DVD with DVD Ripper for WMV

Step2. Select output format and subtitle

After you load the DVD files, click the format drop-down list to select “WMV – Windows Media Video (*.wmv)” or “AVI – Audio Video Interleaved (*.avi)” as the output format. A regular DVD movie has multiple subtitles and audio tracks, and you can select the right one for you. If you just want a certain part of the DVD movie, you can click “trim” to cut the DVD movie. Just drag the timeline bar to set the start and end time, and then blue line will be the captured parts.

Rip  DVD into Windows Movie Maker

For advanced user, if you want to output higher quality video, click the “Settings” button to open the panel, here you can customize video bitrate, audio bitrate, resolution, framerate, etc. Higher bitrate will result in bigger file size.

Step 3. Start to convert

After the above steps, you just need to click “Start” and wait for the conversion to be finished. It provides the fastest conversion speed (>300%), completely support dual core CPU.

Step 4. Edit DVD with Windows Movie Maker (optional)

Run Windows Movie Maker, in the “Movie Task” bar, click “Add Video” to browse your computer and located the converted files, and then you can start to make personal movies.

Edit DVD with Windows Movie Maker

Tips:Many users may wonder how they can convert Windows Movie Maker file (*.MSWMM) to other video format. Actually, A *.MSWMM file is not a video file. It is a project file of Movie Maker (more like a record file). You have to open this file in Windows Movie Maker and save the movie to your computer: Go to Movie Tasks bar > Finish Movie > Save to my computer. After that you will have a WMV file which can be converted to another video format or burned to DVD.

Part2. How to add DVD clips into Apple iMovie.

iMovie is similar to Windows Movie Maker, it supports MOV and MP4 video, so you just need to convert your DVD movie to the right format. Aiseesoft DVD Ripper has a Mac Version which supports both Mac OS Tiger and Leopard; you can download it for free from here: http://www.aiseesoft.com/dvd-ripper-for-mac.html
It is easy to use for the operation steps being similar to the windows version.

put DVD into Apple iMovie

When the conversion is finished, you can run the iMovie, build a new project, and then drag the converted files to the work space to make personal files.
When the task is finished, In the Menu bar, Click "File" -> "Export" and save it as QuickTime video.

put DVD into Apple iMovie

Download Aiseesoft DVD Ripper for Windows (put DVD into Windows Movie Maker)
Download Aiseesoft DVD Ripper for Mac (put DVD into Apple iMovie)

2010年7月9日星期五

Viacom Gets Into Social Games: When Do We See JerseyShoreville?

Viacom wants in on the social game market, and it’s going to try buying its way in. The company has picked up Social Express, a 10-person start-up founded in 2009, so it can build out games based on shows that run on its MTV Networks unit. VentureBeat, which reported the deal, doesn’t have terms.

So, maybe a “Jersey Shore” game, where you get badges for visiting the gym, the tanning salon or the Laundromat? I dunno. Work with me here.

Every big media company is enamored with social games these days, in part because users seem to be–see Zynga–and in part because investors seem to be– see Zynga. Not coincidentally, Social Express is staffed with vets from Zynga, the dominant social game company now valued in the billions.

Wait a minute. Doesn’t Viacom (VIA) have a slew of gaming assets, acquired during the last Web boom? It does! And those help generate 22 million unique visitors a month, says comScore (SCOR). But the first Viacom/Social Express games will show up this fall, so we’ll see what Sumner Redstone got for his money.

2010年7月7日星期三

The End of the iPod Era Part II: The Other Side of the Debate

I recently published an article arguing that the iPod’s importance to Apple’s overall quarterly revenue has diminished to the point of being almost irrelevant to Apple’s (AAPL) growth. Yet, this article seemed to hit the nerves of iPod aficionados who ardently contend that the iPhone is an iPod, and to say otherwise, would constitute the highest level of blasphemy to the Apple investment community.

Read the rest of this post on the original site

2010年7月6日星期二

Apple Puts Out Feelers for Antenna Experts

Read into this what you will, but Apple’s job listings now include at least eight openings for phone antenna and reception experts, several posted right around the time that reports of iPhone 4 antenna problems began to surface. The current crew of engineers certainly has its hands full–as do the AppleCare reps.

2010年7月5日星期一

How to Play all Video Files on Xbox 360 with Mac

This is a step by step guide on how to play any video file on your Xbox 360 from your Apple Mac computer.
How to play any video file on your Xbox 360 with your Mac – Only $35.00 Video Converter for Mac can clear up all your problem.

Here Is What You Will Need:
Xbox 360 - Preferably the Elite version… just because its black. And has black controllers.
Apple Computer - iMac, MacBook Pro, Apple Air, etc.
Video Converter for Mac Only $35.00 - Has a Free Trial!

How to play any video file on your Xbox 360 with your Mac:
Step 1, Convert videos to mp4 format that compatible with Xbox 360.
Choose a small video to test for you first video, as encoding and conversion times can be lengthy if you choose a full movie. Try downloading a trailer for a movie in your favorite format that the Xbox 360 can’t read. Like: AVI, and a lot of other weird formats.
Open up Video Converter for Mac. Video Converter for Mac is a phenomenal video conversion tool, it can convert video formats from one to another with perfect output quality and high conversion speed for Mac OS X users. It supports all popular video formats including flv, MPEG1, MPEG2, MP4, 3GP, 3G2, AVI, M2TS, MPEG TS/TP (for HD Video), M4V, etc.
At the bottom of Video Converter, it shows the format we can convert to. Choose MP4. It is the best.
Choose output folder such as “Open Folder”.

Video Converter for Mac - merge

At the bottom right, click on the “Start” button. Then wait… , And the conversion speed is out of your surprise.

Step 2, connect your Mac and Xbox 360
Before you start configuring, open up Terminal (in Applications -> Utilities) and type "ifconfig en0" (zero, not a capital-o). You're looking for the bit that says "inet xxx.xxx.xxx.xxx". In my case, the number I get here is 192.168.2.1 Second, note down the IP address of your wireless router, which in my case is 192.168.0.1

On your Mac
1. Connect your Mac to your wireless internet connection
2. Connect your Xbox 360 to your Mac via Ethernet
3. In System Preferences -> Sharing, enable Internet Sharing between your Airport and Ethernet connection

On your Xbox 360
1. Start up your Xbox and navigate to the Network settings menu
2. Under IP address, enter the number you got from the "ifconfig en0" command earlier on, but with the final number one place higher. In my case, I take the 192.168.2.1, and input 192.168.2.2 in the IP address box on my Xbox 360.
3. Under subnet, input 255.255.255.0
4. Under router/gateway, enter the number you got earlier from the "ifconfig en0" command. In my case, that's "192.168.2.1"
5. Move onto DNS. Enter the IP address of your wireless router (in my case, "192.168.0.1") in both the primary and secondary IP address fields
6. Leave PPPoE and advanced settings blank (i.e. OFF and Automatic)
7. You should now be able to connect to Xbox Live via your internet sharing Mac

Step 3, Play Video File on Xbox 360:
First, on your Mac, open up your new file in VLC and in QuickTime. Make sure it can play in both (Not necessarily at the same time). If you have done that, now it is time to move to your 360. Follow these instructions:
Turn on your Xbox 360

Turn Xbox 360

Navigate over to the “Media Tab”, and select the “Videos” option.

Xbox 360 - Media Tab

Note: Since the Xbox 360 Dashboard update of about 6 months ago, once you click on”Videos” it will just show you all of the videos on your Xbox 360 hard drive. So presses “X” to change the current source. Then browse down to your Apple / Mac computer. Mine is an iMac.

Click on the “Movies Folder”. That is where you should have saved the file there earlier.
Now browse through your video files and select your sweet, newly converted video file, and play it!put Video on Xbox 360

All the operations is just like pie. So you can watch any your favorite video on your Xbox 36o from your Mac easily Now. Watch and Enjoy it!

2010年7月4日星期日

How to download torrent video and put torrent video to iPod, iPhone, etc

This article includes four parts:
Part 1. What is torrent?
Part 2. How to download torrent files to computer?
Part 3. How to put the torrent videos to iPod, iPhone, PSP, etc
Part 4. Top torrent sites and iPod torrent sites

Part 1. What is torrent?
Torrent is a small file with the suffix .torrent, which contains all the information needed to download a file the torrent was made for. That means it contains file names, their sizes, where to download from and so on. You can get torrents for almost anything on lots of web sites and torrent search engines.
Torrent is the most popular way of downloading large files, including movies and games (remember legality of downloading). Downloading with a torrent is advantageous especially when downloading files, which are momentarily very popular and which lots of people are downloading. Because the more people download the file, the higher speed for everyone.

Part 2. How to download torrent files to computer?
Downloading with a torrent is actually very simple. You just need a rightly set torrent client (setting your connection speed is usually all you need to set). Then you open the torrent file inside your client, set a place where you want to download desired files and then just wait till it's downloaded. Downloading with a torrent is no more complicated than using any other p2p application, but even simpler.
Here are some free torrent clients:
1. A BitTorrent client is a program that manages torrent downloads and uploads using the BitTorrent protocol. BitTorrent is the global standard for accessing rich media over the Internet. It supports Windows, Mac, and Linux.

download and put torrent video on iPod, iPhone
BitTorrent Ports Tip to Speed Up Clients

2. µTorrent (uTorrent) is a free BitTorrent client for Microsoft Windows written in C++ and localized for many different languages. It is designed to use minimal computer resources while offering functionality comparable to larger BitTorrent clients such as Azureus or BitComet. The program has received consistently good reviews for its feature set, performance, stability, and support for older hardware and versions of Windows (For Wine, Windows 95 (Winsock2), 98/ME, NT/2000, XP, 2003, and Vista).
3. BitLet: this is a web-based Torrent client that can download a Torrent file for you if you provide it with the Torrent URL. The obvious benefits of doing this are:
(1) If you are using a computer that doesn't have a Torrent client installed
(2) You can point Torrent-challenged friends who can never figure out how to download torrents to this web service and it just may be the solution to their rare Torrent-downloading needs
(3) You can use it to download torrents in places (work, school) where p2p and/or Torrent clients are blocked.
Bitlet requires that your browsers has the JAVA VM plugin installed.
You can get more free Torrent clients from : http://en.wikipedia.org/wiki/BitTorrent_client

Part 3. How to put the torrent videos to iPod, iPhone, PSP, etc
After you finish downloading the torrent (Video, Song what ever it is) you might need to use winrar or winzip if it is compressed then put it on your iPod. The torrent videos that you download from iPod torrent sites do not need to convert. You can transfer them to iPod using iTunes.
But if they are not in a format the iPod, iPod, iPhone, Zune and other players can play, you might have to convert them. You need to download this best video converter (Mac/Windows PC) which works perfectly for almost all popular video players like iPod touch, iPod classic, iPod nano, iPhone, Apple TV, PSP, PS3, Youtube (web), Creative Zen, iRiver PMP, Archos, various video mobile phones and many other digital video and audio players. Install and use it to convert the torrent videos. After conversion, you can put the torrent videos to iPod touch, iPod classic, iPod nano, iPhone, Apple TV, PSP, PS3, Youtube (web), etc.

Part 4. Top torrent sites and iPod torrent sites
The Top Torrent Sites:
Torrentportal.com
Bitsoup
BiteNova
Torrentscan.com
LegalTorrents.com
Isohunt.com
Torrentspy.com
Torrentz.com
Torrents.to
Snarf It!
Torrentmatrix.com
Mininova.org
FileMP3.org
TorrentBytes.net
Torrentreactor.to
Torrentbox.com.
BTjunkie
TorrentTyphoon.com
Yotoshi.com
The Pirate Bay
TopTorrents
Scrapetorrent.com
Meganova.org
Torrent-damage.net
ByTorrents Meta Search
FullDLS.com
Thinktorrent.com
FileList.org
Torrentlocomotive
bittorrent.com
Fenopy (formerly Bitoogle.com)
BTbot.com
Special mention: Torrents.co.uk
Special mention: LokiTorrent.com
Special mention: Commonbits.com

iPod torrent sites:

http://podtropolis.com/
http://www.iPodnova.com/
http://www.elroyonline.com/

2010年7月2日星期五

How to use Mac The Ripper to rip DVD to iPod, iPhone, etc. on Mac

Part 1. Use MacTheRipper to minus the copy protections for free
Mac The Ripper is a free DVD ripper (extractor) for Mac OS X. It can extract commercial DVD movies to your hard drive, minus all the copy protections and region controls put in place by DVD publishers. Mac The Ripper removes CSS encryption, Macrovision protection, and sets the disc's region code to '0' for region-free by default, and is capable of removing RCE region protection as well, making an unrestricted copy of any DVD movie you own. It doesn't rely on the DVD drive to get the CSS decryption keys, so that means that you do not need to play the DVD with DVD Player in order to rip it to your hard drive unprotected. MacThe Ripper is also capable of removing UOPs, or User Operation Prohibitions, which are the settings that prevent you from skipping or fast-forwarding certain parts of DVDs, such as FBI warnings, previews, logos, intros, etc. Mac The Ripper is also able to extract discs with the new ARccOS protection, as well as DVDs that have been damaged or improperly mastered.
WARNING: Disabling UOPs can break the navigation on certain DVDs. If you disable UOPs, be sure to verify the DVD with DVD Player before you burn it to DVD±R disc.

Step 1. install MacThe Ripper
Download it from: http://www.Mactheripper.org. To install Mac The Ripper, simply mount the .dmg archive by double-clicking it, and copy the Mac The Ripper application from it to your Applications folder (or wherever you want it ), along with this Mac The Ripper Manual if you need it.
Step 2. convert DVD for free
To use Mac The Ripper, you should insert your DVD movie into your DVD drive and launch the Mac The Ripper application. Then, you should set the RCE options if applicable. If Mac The Ripper displays 'DISC RCE: -CLEAR-' after scanning the DVD in the drive, you can leave the 'RCE Region' popup menu on 'OFF', as it is by default. Only (and always) set the 'RCE Region' to 'OFF' when it says that RCE is '-CLEAR-'.
Once you've selected the type of extraction and options you want, you can go back to the 'Disc' tab and click the 'GO!' button (or hit the 'Enter' or 'Return' key) to start the extraction.

Mac The Ripper
Mac The Ripper - dvd extraction

Step 3, finish extract movie from DVD.

Mac The Ripper - extract movie from DVD

You can find a folder in the save location. The output files extracted by MacTheRipper are saved as .VOB format .
Tip: RCE region protection
region 1: North America; U.S. territories; Bermuda
region 2: Europe; Western Asia; Kingdom of the Netherlands; Egypt, Japan, Lesotho, South Africa, Swaziland; British overseas territories, French overseas territories; Greenland.
region 3: East and Southeast Asia
region 4: Oceania; Central and South America; Caribbean; Mexico
region 5: Africa, Central and South Asia, Belarus, India, Mongolia, North Korea, Russia, Ukraine
region 6: Mainland China

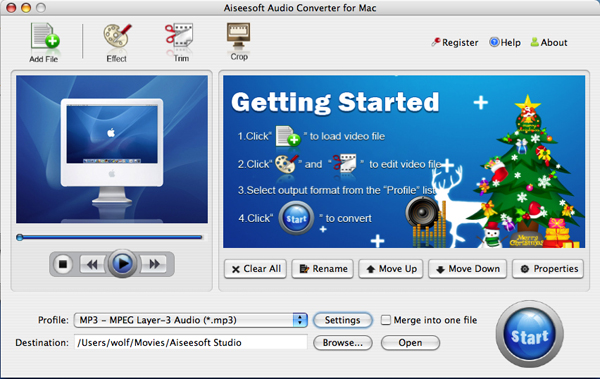
Part 2. Convert the .VOB files to other video, audio formats compatible with iPod, PSP
After using Mac The Ripper to minus the copy protections, we can use Aiseesoft Video Converter for Mac to convert .VOB files to formats that compatible with popular players such as iPod, iPhone(iPhone 3G), Apple TV, PSP, Zune, etc.
Step 1:
Download and install Aiseesoft Video Converter for Mac
Note: If you just want to convert .vob file for iPod, You can choose this powerful iPod video converter for Mac. It can convert .VOB file to iPod video and iPod audio on Mac OS with powerful functions and fast converting speed!
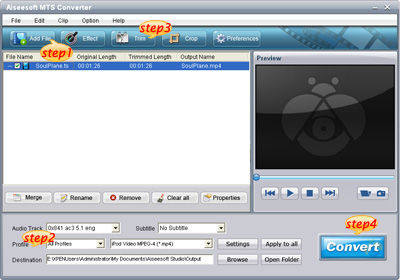
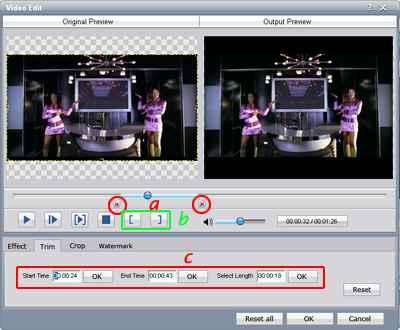
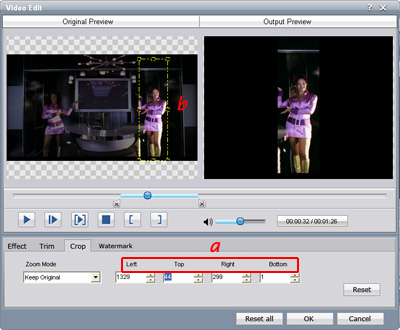
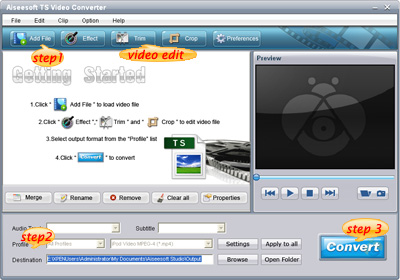
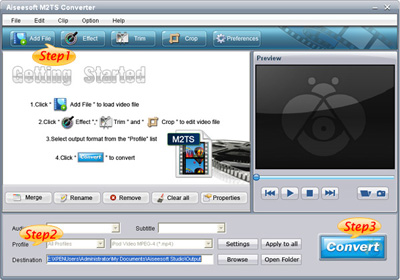
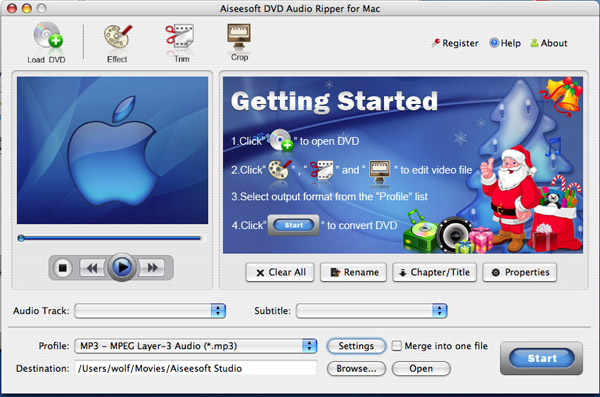
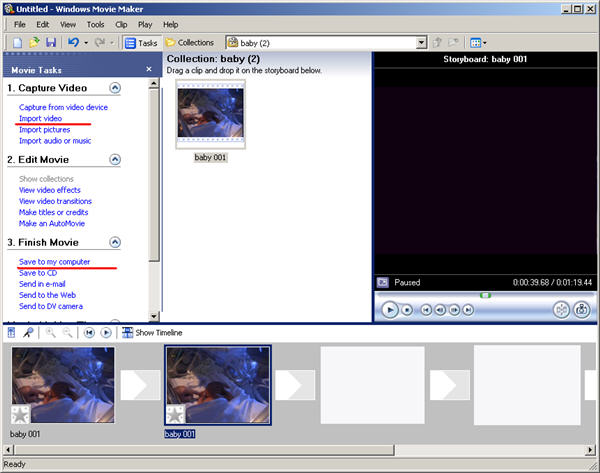
Step 2:
Run Aiseesoft Video Converter for Mac, click 'Add File' button to import the .VOB files, choose the output format, then click 'Start' to start the conversion. If you want to put the video on PowerPoint, you can choose .avi as output format.
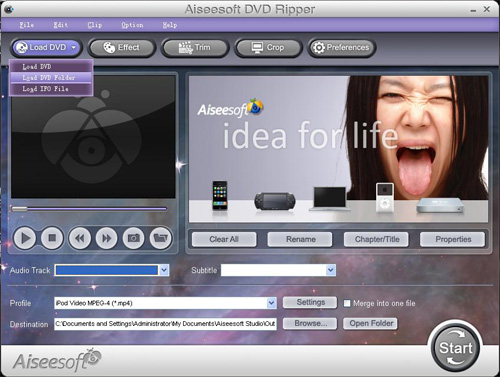
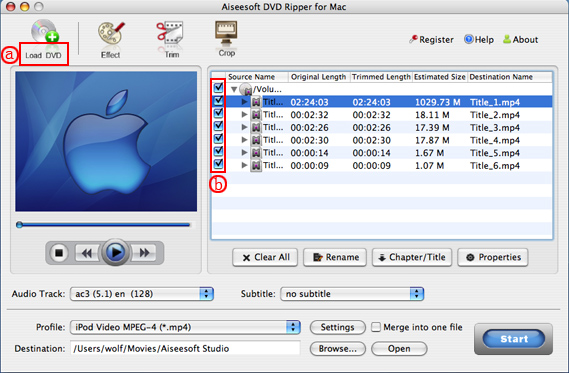
Tip: Aiseesoft DVD Ripper for Mac can rip DVD to all popular video and audio formats directly. It can rip DVD to videos including MP4, AVI, MOV, M4V, 3GP, MPG, MPEG, FLV, etc and can convert DVD audio to MP3, M4A, AAC, AC3, etc. It is more easy to use than Mac the ripper. You can download it for free and have a try.
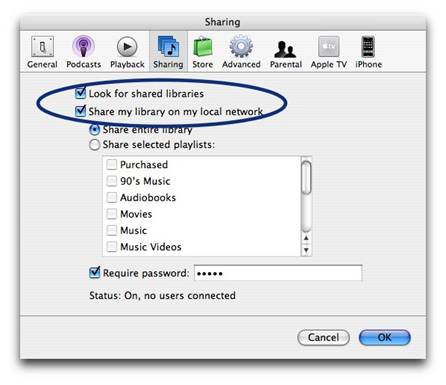
Step 3:
After the conversion is finished, You can transfer the converted files to the players. For example, use iTunes to transfer the mp4 video to your iPod, here are the steps:
1. Open iTunes and click "File" to add your converted videos to iTunes library.
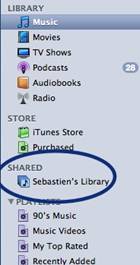
2. Plug in your iPod to computer, then iTunes will detect your iPod as a device.
3. Select your iPod device on the left panel of iTunes, click "Movies" tab, check the videos you want to sync and click "Apply", done.
Recommend: DVD Converter Suite for Mac: all-in-one solution to convert DVD and Video to MP4, AVI, FLV, MOV, MKV, ASF, directly for your iPhone, iPod, PSP, iPod touch, Zune, etc. on Mac OS X.